IT201_Sprint4_Adhavan_Swaminathan
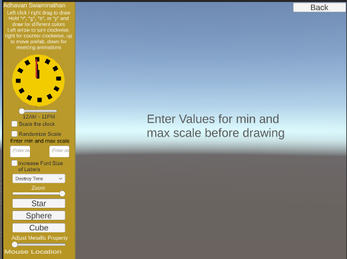
- ALL Features: 12 features in total
- Feature 1: Display Mouse Location
- Description: Text label in the bottom left corner of the screen that shows the x and y location of the mouse
- Input: Mouse location
- Output: Text on the lower left corner of the screen shows the mouse’s X and Y location
- Feature 2: Create Object
- Description: Left-clicking or drag right-clicking the mouse will draw objects (usually spheres unless other shapes are selected) in the position of the mouse
- Input: Mouse left click or drag right button mouse
- Output: A sphere(s) is created wherever the mouse is clicked/dragged
- Feature 3: Change color
- Description: Click the appropriate color’s letter once and you can draw objects of that color independently (without holding the key and drawing because I fixed that feature, see below). Colors are limited to red, green, blue, and yellow.
- Input: Hold “r”, “g”, “b”, or “y” and draw
- Output: The sphere drawn after holding the key will be red, green, blue, or yellow, respectively
- Feature 4: Change metallic property
- Description: Dragging the slider will increase or decrease the metallic property of the objects on the screen, making them look more or less metallic
- Input: Slider that ranges from 0 to 1 to corresponding the values for the metallic property
- Output: The slider value will be reflected on the spheres on the screen by increasing/decreasing their metallic property to match the value
- Feature #5: Change Shape Using Button
- Description: Click the appropriate button will change the shape of the objects drawn to your liking.
- Input: Click Sphere or Cube Button or Star Button (added in Project 3, but Project 2 only had Sphere and Cube Buttons)
- Output: Spheres or Cubes will be drawn, respectively
- Feature #6: Zoom Slider
- Description: Dragging the slider left or right will zoom the camera out or in, respectively,
- Input: Drag the slider to the left or right
- Output: Zooms in or out based on if the slider is dragged right or left, respectively
- Feature #7: Destroy Timer Dropdown
- Description: By choosing one of the three options in the dropdown, you can choose after how long the objects on the screen will erase.
- Input: Click one of three options on the dropdown: 3 secs, 5 secs, or 10 secs
- Output: The objects on the screen will only be destroyed after the time chosen
- Feature #8: Randomize Scale
- Description: After choosing to randomize the scale of the objects, you can enter a range for which you would like to randomize the scale within (the range in clamped to be in between 1 and 5 to avoid any extreme sizes).
- Input: The user clicks on the checkbox to randomize scale, and then input a minimum and maximum value for the scale
- Output: The scale of the objects drawn are randomized between the minimum and maximum values entered.
- Feature #9: Slider to change time and smoothness
- Description: Moving the slider left and right will change the time on the clock (only the hour hand) while also increasing or decreasing the smoothness of the objects drawn.
- Input: Move the slider
- Output: Move the hour hand to correspond to the location of the slider and also increases the smoothness of the objects as the slider increases.
- Feature #10: Increase Font Size of Labels Through Toggle
- Description: Clicking on the checkbox will increase the font size of all of the TMP Text labels on the screen, in case you would like to read them easily.
- Input: User clicks on the checkbox to turn it on or to turn it off
- Output: If on, all of the TMP Texts’ font size increases to 18. If off, they return back to their original font sizes
- Feature #11: Clock face prefab scaling animation
- Description: Clicking on the checkbox allows you to trigger an animation that will increase and decrease the scale of the clock face continuously.
- Input: User clicks on the checkbox to turn it on or off
- Output: If on, the animation for the clock face will trigger and its scale will increase and decrease continuously; if off, the animation will stop and return to normal
- Feature #12: Rotate camera clockwise or counterclockwise
- Description: Clicking the left or right arrow on your keyboard will rotate the camera counterclockwise or clockwise, respectively, continuously, whereas the down arrow will stop the animation
- Input: Click left, right, or down arrow
- Output: If the left arrow is clicked, the camera will animate and rotate counterclockwise. If the right arrow is clicked, the animation state changes and the camera rotates clockwise. If the down arrow is clicked, the animation state changes again and the camera stops rotating.
- Feature 1: Display Mouse Location
